How to Drill Ceramic Pot
Ceramic pots make great home decor items, but they can be expensive to buy. If you have some old ceramic pots that you no longer use, or if you find some at a garage sale or thrift store, you can drill them and turn them into planters. Drilling ceramic pots is not difficult, but there are a few things to keep in mind to avoid damaging the pot.
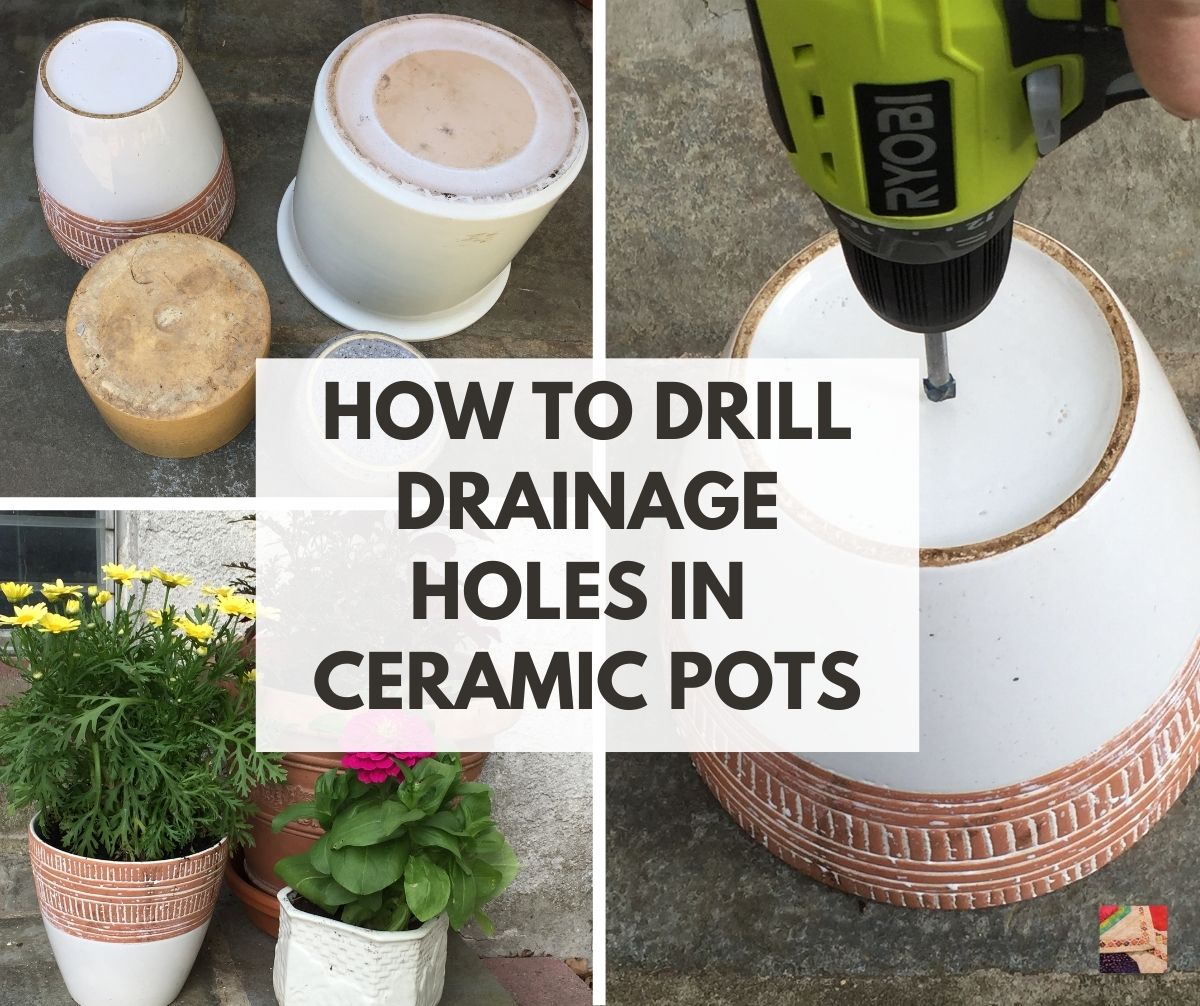
First, use a sharp masonry bit to drill through the glaze and into the clay beneath. Second, go slowly and apply gentle pressure to avoid cracking the pot. Finally, use rubber pads or tape on the outside of the pot to prevent slipping as you drill.
- Select a drill bit that is the same diameter as the screw you will be using
- Insert the drill bit into the chuck of the drill and tighten it in place
- Place the tip of the drill bit on the surface of the ceramic pot where you want to make the hole
- Apply pressure to the drill and start drilling slowly at first, then increase speed as needed
- Keep drilling until you have reached the desired depth or until you break through to the other side of the pot
- Remove the drill bit from the chuck and set it aside
Drill Drainage Holes in Pots WITHOUT Breaking Them! (Foolproof Method)
Can You Drill Holes into Ceramic Pots?
You can drill holes into ceramic pots! It’s a great way to add drainage for your plants, or to create a unique design. Here are a few things you’ll need to keep in mind:
– Make sure your drill bit is sharp. A dull bit will cause the ceramic to crack.
– Start with a small hole and work your way up to the size you need.
– Go slowly! Drilling too quickly will also cause the ceramic to crack.
– Use water to keep the pot cool while you’re drilling.
This will help prevent cracking.
How Do You Drill a Hole in a Ceramic Pot Without Breaking It?
If you need to drill a hole in a ceramic pot, there are a few things you can do to make sure you don’t break it. First, make sure the pot is dry and clean. Then, use a sharp bit that is slightly smaller than the desired hole size.
Start drilling slowly, and increase speed as needed. If the pot starts to crack, stop drilling immediately.
What Drill Bit is Needed for Ceramic Pots?
When it comes to drilling into ceramic pots, the type of drill bit you’ll need will depend on the thickness of the pot. If you’re working with a thinner pot, then a standard metal drill bit will do the trick. However, if the pot is thicker, then you’ll need a masonry drill bit that’s specifically designed for drilling into stone and other hard materials.
Once you’ve determined which type of drill bit you need, it’s important to take care when actually drilling into the pot. Start by creating a small pilot hole before switching to the larger drill bit. This will help to prevent the pot from cracking as you work.
And when possible, try to avoid applying too much pressure as you drill – letting the weight of the drill do most of the work for you.
With a little patience and care, drilling into a ceramic pot is relatively easy and straightforward. Just be sure to use the right type of drill bit for your project, and take things slowly at first until you get a feel for how best to proceed.
How Do You Drill a Hole in a Ceramic Pot by Hand?
If you’re looking to drill a hole in a ceramic pot by hand, there are a few things you’ll need to keep in mind. First, it’s important to use a sharp bit – dull bits can cause the ceramic to crack. Second, go slowly and apply steady pressure – too much pressure can cause the bit to slip and damage the pot.
Finally, make sure you’re using plenty of water to keep the pot cool and prevent cracking.
With these tips in mind, let’s get started. First, mark where you want to drill the hole with a pencil or pen.
Then, set your pot on a stable surface – a table or countertop will do nicely. Next, take your sharp bit and begin drilling slowly, applying steady pressure as you go. As you drill, keep an eye on your progress and add more water if needed to keep the pot cool.
Once you’ve drilled through the ceramic wall of the pot, slow down and be careful not to damage the inside of the pot as you finish up. When you’re done, clean up any debris and enjoy your newly-drilled hole!

Credit: www.bybrittanygoldwyn.com
Drill Bit for Glazed Ceramic Pot
If you’re looking for a drill bit that can handle glazed ceramic pots, you’ve come to the right place. In this blog post, we’ll give you all the information you need to know about choosing the right drill bit for your project.
We’ll start by discussing the different types of materials that glazed ceramic pots are made from.
Then, we’ll talk about the different drill bits that are available and which ones are best suited for drilling through glazed ceramic. Finally, we’ll give you some tips on how to successfully drill through glazed ceramic without damaging your pot.
Glazed ceramic pots are made from one of two materials: porcelain or stoneware.
Porcelain is a harder material, while stoneware is more brittle. Because of this, it’s important to choose a drill bit that is designed for use with the specific type of material your pot is made from.
There are two main types of drill bits that can be used on glazed ceramic: masonry bits and carbide-tipped bits.
Masonry bits have a sharp point and fluted edges that help them penetrate hard surfaces like porcelain. Carbide-tipped bits have a pointed tip but no flutes; instead, they rely on their hardness to penetrate even the hardest materials.
Both masonry bits and carbide-tipped bits will work well on glazed ceramic pots; however, carbide-tipped bits are generally considered to be better suited for this task because they’re less likely to chip or break the pot as you’re drilling through it.
If your pot is made from stoneware, though, a masonry bit may be your best bet since it’s less likely to shatter the material as you’re drilling through it. Either way, make sure you choose a drill bit that matches the material your pot is made from before beginning your project.
Once you’ve selected an appropriate drill bit, there are a few things you should keep in mind when drilling through glazed ceramic: go slowly, use plenty of water (to cool down both the pot and the drill bit), and apply moderate pressure when drilling (too much pressure can cause chips or cracks).
With these tips in mind, success is sure to follow!
Conclusion
If you’re looking to add a little character to your home decor, try drilling holes into ceramic pots! It’s a simple process that anyone can do with the right tools. First, gather your supplies: a hammer, drill bit, and tape measure.
Next, mark where you want to drill the holes using the tape measure and pencil. Be sure to wear safety goggles while you work! Once you’ve made your marks, begin drilling slowly at a low speed.
Apply pressure evenly as you go; if the drill bit starts to wander, stop and realign it before continuing. When you’re finished drilling, sand down any sharp edges with sandpaper. Now your pot is ready for planting!