How To Make A Stoneware Pottery Bowl
Stoneware pottery bowls are not only functional but also beautiful works of art. The art of pottery making has been practiced for centuries, and stoneware bowls continue to captivate people with their unique charm.
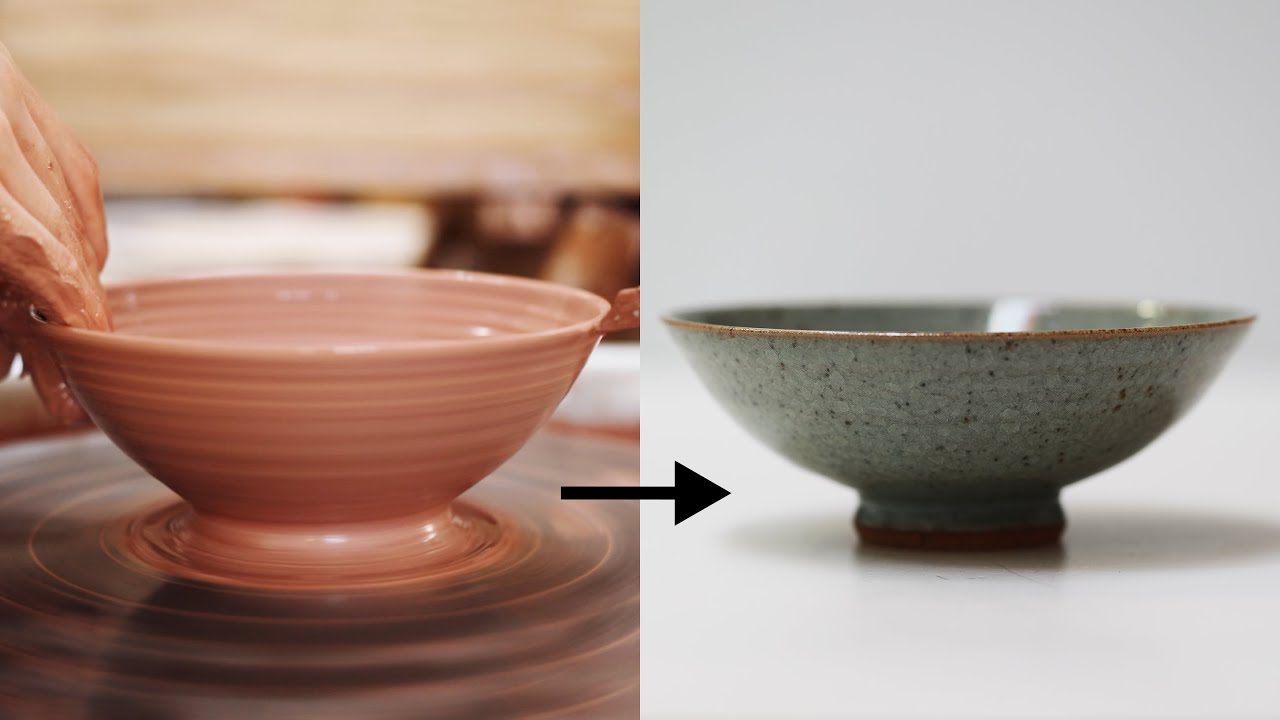
In this article, we will take you through the step-by-step process of making a stoneware pottery bowl. From preparing the clay to firing and glazing, we will explore each stage of the pottery-making journey.
Materials and Tools
Before diving into the process, let’s gather the essential materials and tools needed for creating a stoneware pottery bowl. You will require:
- Stoneware clay
- Pottery wheel
- Pottery tools (such as ribs, wire cutters, and trimming tools)
- Water container
- Sponges
- Kiln
- Glazes
- Brushes
Preparing the Clay
The first step in making a stoneware pottery bowl is preparing the clay. Start by wedging the clay to remove air bubbles and ensure its consistency. Wedging involves kneading the clay on a clean surface, folding and pressing it to create a uniform texture. This process makes the clay more pliable and easier to work with.
Centering the Clay
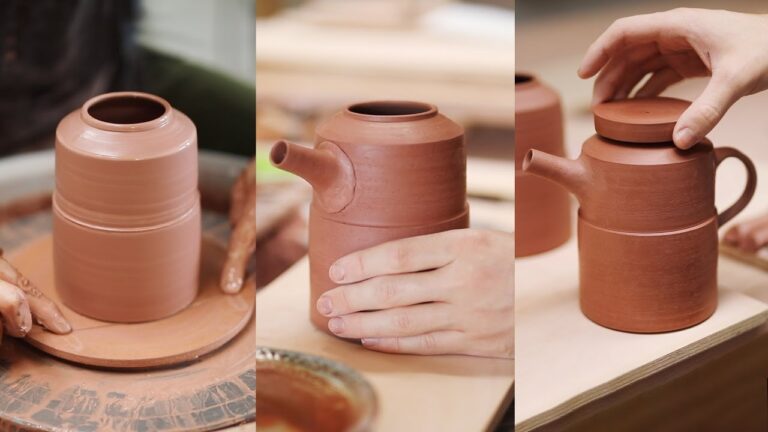
Once the clay is prepared, it’s time to center it on the pottery wheel. Centering is a crucial step as it lays the foundation for creating a well-balanced bowl. With your hands, apply even pressure on the clay while the wheel spins, gradually shaping it into a symmetrical mound at the center of the wheelhead.
Throwing the Bowl
Now comes the exciting part – throwing the stoneware pottery bowl. Dip your hands in water to keep the clay moist and prevent sticking. Apply gentle pressure to the clay as the wheel spins, gradually pulling it upward to create the desired shape and height. Use your fingers and pottery tools to refine the curves and smooth the surface of the bowl.
Trimming and Finishing
After the bowl has been thrown, it’s time to trim away excess clay and refine its shape. Use a trimming tool to carefully remove any uneven edges and create a foot for the bowl. This process helps ensure stability and adds a professional touch. Additionally, if desired, you can add decorative elements or handles at this stage.
Drying and Firing
Once the bowl is shaped and trimmed, it needs to dry thoroughly before firing. Place it in a clean, dry area with good airflow, allowing the moisture to gradually evaporate. This slow drying process minimizes the risk of cracks or warping. Once dry, the bowl is ready for the first firing.
Glazing
Glazing is where the magic happens, giving the stoneware pottery bowl its unique colors and finish. There are various glazing techniques to explore, such as dipping, brushing, or spraying. Apply the glazes evenly and according to the manufacturer’s instructions. Experiment with different combinations of glazes to create captivating patterns and effects.
Kiln Firing
To transform the glazed bowl into a durable stoneware piece, it needs to be kiln fired. Place the bowl carefully in the kiln, ensuring it has enough space around it. Follow the firing schedule recommended for your stoneware clay, gradually increasing the temperature until it reaches the desired range for firing. This process will harden the clay and make it resistant to water absorption.
Final Touches and Polishing
Once the bowl is fired and cooled, you can refine its surface further. Lightly sand any rough areas or use a burnishing tool to achieve a smooth and polished finish. Take your time to examine the bowl and make any necessary final adjustments.
Caring for Your Stoneware Pottery Bowl
To maintain the beauty and longevity of your stoneware pottery bowl, proper care is essential. Hand wash the bowl using mild soap and a soft sponge. Avoid subjecting it to extreme temperature changes, such as placing it directly from the refrigerator to the oven. When storing the bowl, ensure it is protected from potential chips or scratches.
Tips and Troubleshooting
- Keep the clay covered when not in use to prevent it from drying out.
- If the clay becomes too dry while working, mist it lightly with water.
- If the bowl collapses or loses its shape during throwing, start over by re-centering the clay.
- Experiment with different techniques and shapes to develop your pottery skills.
Safety Precautions
While pottery making is an enjoyable craft, it’s important to prioritize safety. Here are some precautions to keep in mind:
- Use appropriate protective gear, such as gloves and goggles.
- Be cautious when handling sharp pottery tools.
- Follow the manufacturer’s instructions for using and maintaining the kiln.
- Ensure proper ventilation in the pottery studio to minimize exposure to dust and fumes.
Inspiration and Creativity
Creating stoneware pottery bowls opens up a world of artistic possibilities. Let your imagination guide you as you explore different designs, patterns, and glazes. Each bowl you make is a unique expression of your creativity.
FAQs
1. How long does it take to make a stoneware pottery bowl?
The time required depends on various factors, including the complexity of the design and the experience of the potter. On average, it can take several hours to complete a bowl, excluding the drying and firing time.
2. Can I use regular clay instead of stoneware clay?
While regular clay can be used, stoneware clay is specifically formulated to withstand high temperatures and produce durable pottery. Using stoneware clay ensures the longevity of your bowl.
3. Can I glaze my stoneware pottery bowl without a kiln?
No, glazing requires high temperatures to fuse the glaze to the pottery. A kiln is necessary to achieve the desired results.

4. How do I fix cracks in my pottery bowl?
If cracks occur during the drying or firing process, they are difficult to fix. It’s best to start over with a fresh piece of clay. However, if the cracks are minor, you can try repairing them using clay slip or glaze.
5. Can I use my stoneware pottery bowl for food?
Yes, stoneware pottery bowls are safe for food use. However, it’s important to ensure they are properly glazed and fired to make them food-safe.
Conclusion
Making a stoneware pottery bowl is a gratifying and enriching experience. From the initial preparation of the clay to the final touches, each step requires patience, skill, and creativity. By following the outlined process and considering the provided tips and troubleshooting suggestions, you can create beautiful stoneware pottery bowls that will delight both you and others.