How To Make Pottery Kick Wheel
Pottery is an ancient art form that allows individuals to express their creativity and craft functional objects. One of the key tools used by potters is the pottery kick wheel, a traditional and versatile device for shaping clay. In this article, we will guide you through the process of making your own pottery kick wheel, providing step-by-step instructions and valuable tips along the way.
1. Introduction
Pottery kick wheels have been used for centuries by artisans to create beautiful and unique pottery pieces. Unlike electric pottery wheels, kick wheels are powered by the potter’s foot, allowing for a more hands-on and immersive experience. By building your own pottery kick wheel, you not only gain a deeper understanding of its mechanics but also the satisfaction of using a tool you crafted yourself.
2. Understanding the Pottery Kick Wheel
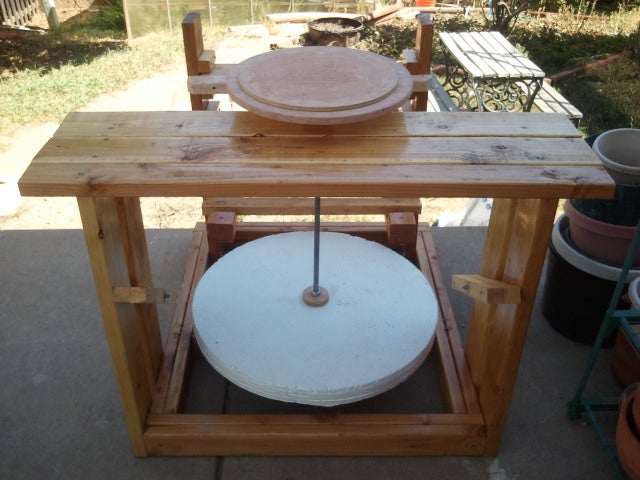
Before diving into the construction process, it’s essential to understand the basic components of a pottery kick wheel. A typical kick wheel consists of a sturdy frame, a wheel head where the clay is placed, a kick mechanism, a flywheel for momentum, and a treadle for foot control. These components work together to facilitate the rotational movement required for pottery throwing.
3. Materials and Tools Needed
To begin building your pottery kick wheel, gather the following materials and tools:
- Wood planks for the frame
- Plywood or MDF board for the wheel head
- Metal rods and brackets for support
- Bearings or bushings for smooth rotation
- Metal or wooden pulleys
- Leather or nylon strap
- Screws, bolts, and nuts
- Wood glue
- Drill and drill bits
- Saw and chisels
- Wrenches and screwdrivers
Ensure you have all the necessary materials and tools before proceeding with the construction.
4. Step 1: Building the Frame
The frame serves as the foundation of your pottery kick wheel. Start by cutting the wood planks to the desired lengths and assembling them into a rectangular shape. Use wood glue and screws to secure the joints, ensuring a sturdy and stable structure. Reinforce the corners with metal brackets for added support.
5. Step 2: Constructing the Wheel Head
The wheel head is where the clay is centered and shaped. Cut a circular piece of plywood or MDF board to the desired diameter and drill a centered hole. This hole will accommodate the shaft that connects the wheel head to the frame.
6. Step 3: Attaching the Wheel Head to the Frame
Attach the wheel head to the frame by inserting the shaft through the hole in the wheel head and securing it with bearings or bushings. Ensure that the wheel head rotates smoothly by testing its movement.
7. Step 4: Adding the Kick Mechanism
The kick mechanism is crucial for transferring energy from your foot to the wheel head. Attach a metal or wooden pulley to the wheel head’s shaft and connect it to the treadle using a leather or nylon strap. This setup allows the wheel head to rotate when the treadle is kicked.
8. Step 5: Creating the Flywheel
The flywheel provides momentum to keep the wheel head spinning smoothly. Attach a larger pulley to the same shaft as the wheel head and add weight to it. This weight can be achieved by attaching metal plates or other heavy objects to the pulley.
9. Step 6: Assembling the Treadle and Pivot
The treadle serves as the foot pedal for controlling the pottery kick wheel. Build a sturdy treadle using wood planks and attach it to the frame with hinges. Connect the treadle to the flywheel’s pulley using another leather or nylon strap.
10. Step 7: Balancing the Wheel
Achieving a balanced wheel is crucial for optimal performance. Make adjustments to the position of the flywheel and the wheel head until the wheel spins smoothly and evenly when kicked.
11. Step 8: Testing and Adjustments
Once the pottery kick wheel is assembled, thoroughly test its functionality. Sit on the stool, position your foot on the treadle, and practice kicking to rotate the wheel head. Make any necessary adjustments to the tension of the strap, the positioning of the wheel head, or the balance of the flywheel for improved performance.
12. Maintenance and Care
To ensure the longevity of your pottery kick wheel, regular maintenance is essential. Keep the bearings or bushings lubricated, clean the wheel head after each use, and inspect the frame for any signs of wear or damage. With proper care, your kick wheel can last for many years.

13. Advantages of a Pottery Kick Wheel
Using a pottery kick wheel offers several advantages. Firstly, it allows for a more tactile and intimate pottery experience, enabling potters to connect with their creations on a deeper level. Additionally, kick wheels are not reliant on electricity, making them suitable for off-grid or outdoor pottery studios. Moreover, kick wheels are often more affordable than their electric counterparts, making them accessible to a broader range of potters.
14. Tips for Using a Pottery Kick Wheel
To make the most of your pottery kick wheel, consider the following tips:
- Start with smaller clay projects to familiarize yourself with the wheel’s dynamics.
- Use the momentum of the flywheel to maintain a consistent rotational speed.
- Experiment with different foot pressures and kicking techniques to achieve varying effects.
- Keep your body posture relaxed and centered for optimal control.
- Practice regularly to improve your skills and achieve better results.
Frequently Asked Questions
1. Is building a pottery kick wheel difficult?
Building a pottery kick wheel requires some woodworking skills and basic knowledge of tools. However, with the right instructions and patience, it can be accomplished by individuals with intermediate DIY skills.
2. How long does it take to build a pottery kick wheel?
The time required to build a pottery kick wheel depends on your skill level and the availability of materials and tools. It can take anywhere from a few days to a couple of weeks to complete the construction process.
3. Can I modify the design of the pottery kick wheel?
Absolutely! The instructions provided in this article serve as a general guide. Feel free to modify the design and dimensions to suit your preferences and requirements.
4. How much does it cost to build a pottery kick wheel?
The cost of building a pottery kick wheel can vary depending on the materials used and the availability of tools. On average, it can range from $200 to $500, but it’s possible to build one for less if you have access to affordable or recycled materials.
5. Where can I find additional resources on pottery-making?
There are various online resources, forums, and pottery communities where you can find valuable information and connect with fellow potters. Additionally, pottery classes or workshops in your local area can provide hands-on guidance and support.
15. Conclusion
Building your own pottery kick wheel is a rewarding endeavor that allows you to fully immerse yourself in the pottery-making process. By following the step-by-step instructions provided in this article, you can create a functional and personalized kick wheel that suits your pottery needs. Enjoy the satisfaction of using a tool you crafted yourself and embrace the unique creative possibilities it offers.