How To Learn Pottery Step-by-Step In-Details
Pottery is an ancient art form that allows you to express your creativity while creating functional and decorative items from clay. Whether you’re a beginner or looking to refine your pottery skills, this step-by-step guide will provide you with the essential knowledge and techniques to learn pottery in detail.
Introduction
Pottery has been an integral part of human civilization for thousands of years. It encompasses various techniques and processes that transform clay into beautiful and durable objects.
Learning pottery can be a rewarding and meditative experience, allowing you to explore your artistic side and develop a deeper connection with the earthy medium. In this article, we will take you through the journey of learning pottery step by step, providing you with the knowledge and guidance to embark on your pottery adventure.
Understanding Pottery
What is pottery?
Pottery refers to objects made from clay that are shaped and hardened through various techniques and firing processes. It encompasses a wide range of items, including pottery vessels, sculptures, tiles, and more. Pottery serves both functional and artistic purposes, and its rich history and cultural significance make it a fascinating craft to explore.
History and significance of pottery
Pottery has a long and storied history that dates back to prehistoric times. Ancient civilizations around the world developed unique pottery traditions, leaving behind remarkable artifacts that provide insights into their culture, lifestyle, and artistic prowess. From the delicate porcelain of China to the intricate pottery of the Ancient Greeks, pottery has played a vital role in human development and cultural expression.
Getting Started with Pottery
Before diving into the world of pottery, it’s essential to gather the necessary materials and set up a pottery studio that suits your needs. Here are the initial steps to get you started:
Gathering necessary materials and tools
To begin your pottery journey, you’ll need the following basic materials and tools:
- Clay: Choose a clay type suitable for your desired pottery techniques and firing methods. Common types include earthenware, stoneware, and porcelain.
- Pottery wheel (optional): A pottery wheel is used for wheel throwing techniques. While not necessary for all pottery forms, it adds versatility to your craft.
- Handbuilding tools: These include clay modeling tools, a rolling pin, a cutting wire, and various shaping implements.
- Kiln: A kiln is used to fire and harden the pottery. Depending on your access and budget, you can choose an electric or gas kiln.
- Glazes and underglazes: These are used to add color and surface finishes to your pottery. Choose glazes suitable for your clay type and firing temperature.
Setting up a pottery studio
Once you have the necessary materials and tools, it’s time to set up your pottery studio. Consider the following factors:
- Space: Find a dedicated space where you can work comfortably and safely. It can be a spare room, garage, or even a corner of your home.
- Workbench and storage: Set up a sturdy workbench at a suitable height for your comfort. Create storage areas for clay, tools, and finished pottery.
- Ventilation: Pottery involves working with clay and glazes, which can generate dust and fumes. Ensure proper ventilation to maintain a healthy workspace.
- Safety equipment: Wear protective gear such as gloves and goggles when handling clay, glazes, or kiln operation.
With your materials and studio ready, it’s time to dive into the fundamental techniques of pottery.
Basic Techniques of Pottery
Mastering the basic techniques of pottery will provide you with a solid foundation for exploring more advanced forms and styles. The three primary techniques to focus on are handbuilding, wheel throwing, and surface decoration.

Handbuilding techniques
Handbuilding refers to creating pottery forms using your hands and basic tools. It allows for greater creativity and experimentation compared to wheel throwing. Common handbuilding techniques include:
- Pinch pottery: This technique involves shaping clay by pinching and pressing it with your fingers.
- Coil pottery: Coiling entails rolling clay into long, snake-like coils and layering them to build up the desired form.
- Slab pottery: Slab construction involves rolling out clay into flat sheets and cutting and joining them to create shapes.
- Sculpting: Sculpting is a versatile technique that allows you to create three-dimensional forms and intricate details using clay and sculpting tools.
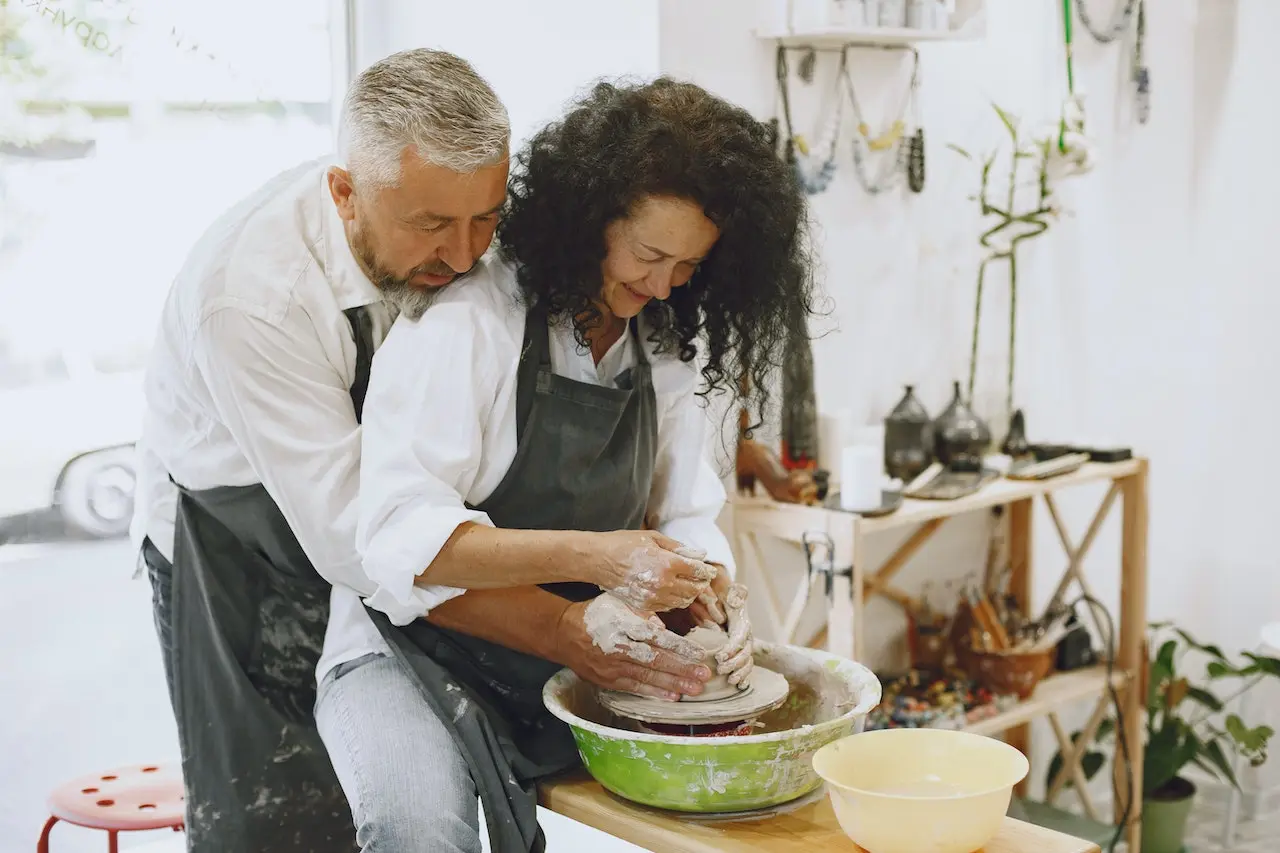
Wheel throwing techniques
Wheel throwing is a popular pottery technique that utilizes a pottery wheel to create symmetrical forms. Here’s a step-by-step process for wheel throwing:
- Centering: Position a ball of clay on the wheel head and use your hands to center it by applying even pressure.
- Opening: Create a hollow space in the center of the clay by gently pushing your thumb into the clay while the wheel is spinning.
- Pulling and shaping: With your hands wet, use your fingers and palms to shape the clay as the wheel spins. Apply gentle pressure to pull up the walls and create the desired form.
- Trimming: Once the pottery has hardened to a leather-hard state, use trimming tools to refine the shape, remove excess clay, and create a foot for the vessel.
Surface decoration techniques
Surface decoration enhances the visual appeal of pottery. Various techniques can be used to achieve unique textures, patterns, and designs:
- Carving: Carve into the clay surface using carving tools to create intricate designs or texture.
- Slip trailing: Use slip (liquid clay) in a squeeze bottle to draw lines or create raised patterns on the pottery surface.
- Sgraffito: Apply a contrasting layer of slip or underglaze to the pottery surface and then scratch through it to reveal the base layer.
- Stamping: Press objects or specially designed stamps into the clay to create patterns or textures.
Mastering these basic techniques will set you on the path to becoming a proficient potter. Now let’s dive into a step-by-step guide to learning pottery in detail.
Step-by-Step Guide to Learning Pottery
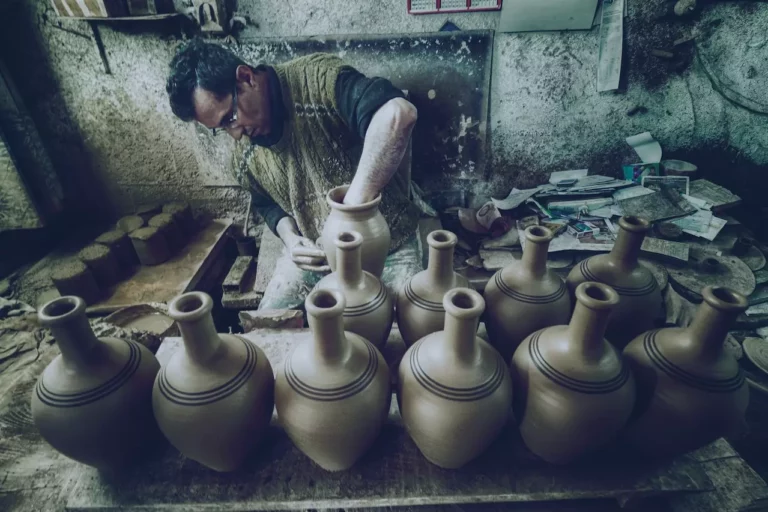
Preparing clay
Before you start working with clay, it’s important to prepare it properly:
- Wedging: Wedging is the process of removing air bubbles and ensuring the clay is uniformly mixed. Cut the clay into slices, slam them together, and repeat the process until the clay becomes pliable and smooth.
- Kneading: Knead the clay with your hands to further remove air pockets and improve its workability.
Creating basic pottery forms
Once your clay is ready, you can start creating basic pottery forms using the techniques mentioned earlier. Here’s a step-by-step process:
- Pinch pottery: Take a small amount of clay, pinch it with your fingers, and gradually shape it into a bowl or cup form.
- Coil pottery: Roll out clay into coils and stack them, shaping them into vessels or sculptural forms.
- Slab pottery: Roll out clay into flat sheets and cut and join them to create plates, tiles, or boxes.
- Wheel throwing: Center the clay on the pottery wheel and follow the wheel throwing techniques discussed earlier to create bowls, cups, or vases.
Trimming and refining pottery
Once the basic forms are created, it’s time to refine them through trimming. Here’s how:
- Use trimming tools to remove excess clay from the bottom of the pottery and create a foot or base.
- Smooth the edges and refine the shape using sponge or rib tools.
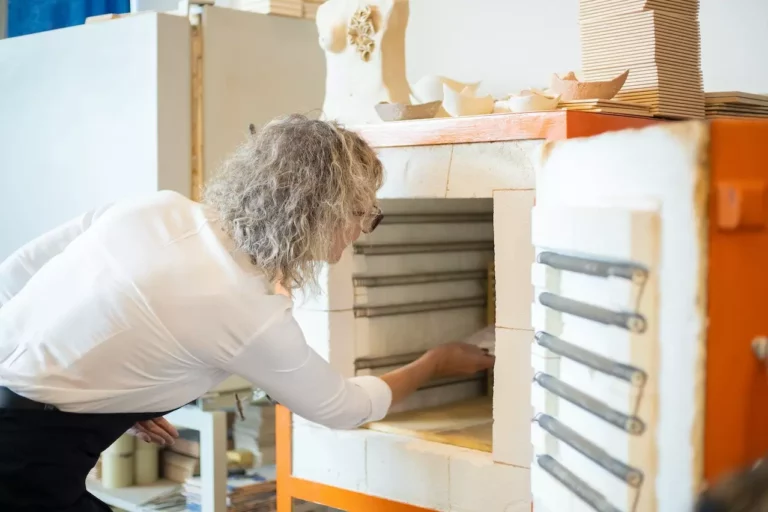
Drying and bisque firing
After shaping and refining your pottery, allow it to dry gradually. This drying process is crucial to prevent cracking during firing. Once the pottery is bone-dry, it’s ready for bisque firing.
- Load the bone-dry pottery into the kiln, ensuring proper spacing between pieces.
- Follow the manufacturer’s instructions to set the appropriate firing temperature and duration for bisque firing.
- Allow the kiln to cool down before unloading the bisque-fired pottery.
Glazing and final firing
After the bisque firing, it’s time to glaze your pottery to add color, texture, and a protective layer. Here’s a step-by-step process:
- Choose glazes suitable for your clay type and desired effect.
- Apply glazes using brushes, dipping, pouring, or spraying techniques.
- Ensure even coverage and avoid glaze pooling in crevices or edges.
- Load the glazed pottery back into the kiln, following the recommended firing temperature and duration for the glazes used.
- Once the final firing is complete, allow the pottery to cool down before unloading.
Congratulations! You have successfully completed the pottery-making process. Now, let’s explore some advanced techniques and resources to further enhance your pottery skills.
Exploring Advanced Pottery Techniques
Once you’ve mastered the basics of pottery, you can venture into more advanced techniques to expand your artistic repertoire. Here are some techniques to explore:
Sculpting and carving
Sculpting allows you to create three-dimensional forms and detailed sculptures using clay. You can use sculpting tools to shape and refine the clay, creating intricate textures and capturing the essence of your subject.
Carving is another technique that involves cutting into the clay surface to create patterns, designs, or intricate details. It requires precision and patience, but the results can be stunning.
Texturing and stamping
Texture can add depth and visual interest to your pottery. Explore various texturing techniques, such as using fabric, shells, or found objects to create unique textures on the clay surface. Stamping can also be used to add repetitive patterns or designs to your pottery.
Slip casting and mold making
Slip casting involves creating pottery forms by pouring liquid clay (slip) into molds. This technique allows for precise replication of forms and can be used to create intricate shapes or multiples of the same design. Mold making involves creating custom molds from existing objects or sculptures, giving you the ability to reproduce them in clay.
Raku firing
Raku firing is a traditional Japanese firing technique known for its unpredictable and dramatic results. It involves removing the pottery from the kiln at high temperatures and rapidly cooling it, often in a combustible material such as sawdust or leaves. Raku firing produces unique and vibrant surface effects, making it a favorite among potters.
Learning from Pottery Resources and Communities
To enhance your pottery skills and knowledge, there are various resources and communities available to support your journey. Here are some avenues to explore:
Pottery classes and workshops
Consider joining pottery classes or workshops offered by local studios, art centers, or community colleges. These provide hands-on instruction, guidance, and feedback from experienced potters. You’ll also have the opportunity to connect with other pottery enthusiasts and build a supportive network.
Online tutorials and videos
The internet is a treasure trove of pottery resources. Many websites, blogs, and video platforms offer step-by-step tutorials, demonstrations, and informative articles. Explore platforms like YouTube, Instagram, and pottery-specific websites to access a wealth of free or paid pottery content.
Joining pottery clubs and communities
Engage with the pottery community by joining local pottery clubs or online forums. These communities offer a space to connect with fellow potters, exchange ideas, seek advice, and participate in group activities such as pottery challenges or exhibitions. The collective knowledge and support of these communities can greatly enrich your pottery journey.
Troubleshooting and Tips for Success
As with any craft, pottery comes with its own set of challenges. Here are some common problems potters face and tips to overcome them:
Common pottery problems and solutions
- Cracking: To avoid cracking, ensure that your clay is properly wedged and evenly dried. Slow drying and gradual temperature increases during firing can also help prevent cracks.
- Warping: Warping occurs when pottery deforms during firing. Use proper clay thickness, evenly distribute glazes, and avoid abrupt temperature changes during firing to minimize warping.
- Glaze defects: Uneven glaze application can result in drips, pinholes, or uneven coloration. Take your time to apply glazes carefully and follow recommended firing schedules for optimal results.
Tips for improving pottery skills
- Practice regularly: Dedicate regular time to practice pottery. Consistency and repetition will help refine your techniques and develop muscle memory.
- Experiment with different clays and glazes: Explore various clay types and glazes to understand their unique properties and effects. Experimentation will broaden your creative possibilities.
- Seek feedback: Join critique sessions or seek feedback from experienced potters. Constructive criticism will help you identify areas for improvement and grow as a potter.
Showcasing and Selling Your Pottery
Once you’ve created pottery pieces you’re proud of, you may want to showcase and sell them. Here are some steps to consider:
Photographing pottery
Capture high-quality images of your pottery to showcase them online or in promotional materials. Use natural lighting, clean backgrounds, and multiple angles to highlight the details and craftsmanship of your work.
Setting up an online shop or attending art fairs
Consider setting up an online shop on platforms like Etsy, Shopify, or your own website to sell your pottery. Alternatively, you can participate in local art fairs, markets, or exhibitions to showcase and sell your work in person.
Building a brand and promoting your pottery
Develop a unique brand identity for your pottery by creating a distinctive style, logo, or artist statement. Promote your work through social media, online communities, and collaborations with other artists or businesses. Engage with your audience, share your creative process, and educate them about your pottery techniques and inspirations.
FAQs (Frequently Asked Questions)
Q1: How long does it take to learn pottery?
A1: The time it takes to learn pottery varies depending on individual dedication, practice time, and learning opportunities. With consistent practice, you can start creating basic pottery forms within a few weeks or months.
Q2: Is pottery expensive to get started?
A2: The cost of getting started in pottery can vary. Basic pottery tools, clay, and a kiln can be affordable, but additional equipment and high-quality materials may increase the expense. Consider starting with essential tools and gradually expanding your collection as you progress.
Q3: Can I do pottery at home without a pottery wheel?
A3: Absolutely! Handbuilding techniques such as pinch pottery, coil pottery, and slab construction can be done without a pottery wheel. These techniques offer ample opportunities for creativity and expression.
Q4: Can I use regular oven instead of a kiln?
A4: No, a regular oven is not suitable for firing pottery. Pottery requires higher firing temperatures, and kilns are designed to reach and maintain these temperatures safely.
Q5: How do I clean and maintain my pottery tools?
A5: After each use, clean your tools with water and a brush to remove clay residue. Dry them thoroughly and store them in a clean and dry place. Regular maintenance ensures the longevity of your tools.
Q6: Can I repair cracked pottery?
A6: Yes, you can repair cracked pottery using suitable clay and adhesive. However, the repaired piece may have visible seams, so it’s important to consider if the repair aligns with your artistic vision.
Conclusion
Learning pottery is a fulfilling and creative journey that allows you to express yourself through clay. By following the step-by-step guide, exploring advanced techniques, and tapping into the pottery community and resources, you can develop your skills and create beautiful pottery pieces. Embrace the joy of working with clay, embrace the imperfections, and let your creativity flow.